Monday, November 13, 2017

Compiling a Node.JS app into a .EXE using PKG step by step walkthrough and hints about zeit pkg and completing dynamic requires using package.JSON

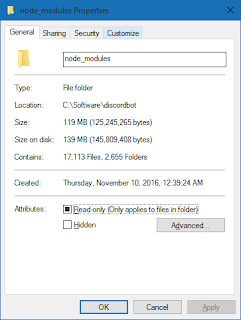
I have a Node.JS app thats very bloated on disk (lot of node.js dependencies) and a huge file tree.
In this guide, we will turn that from:


Using:

https://github.com/zeit/pkg - Node.JS Binary Compiler

"This command line interface enables you to package your Node.js project into an executable that can be run even on devices without Node.js installed."

Start up a command prompt with Node installed and run:
npm install -g pkg
The actual command to compile is one such as:
pkg discordbot --targets latest-win-x64 --debug

Usage:
pkg = this command (npm node command)
entrypoint = the folder of the node.js app, or . for current dir - must find package.json
--targets = nodeRange-platform-arch
    nodeRange node${n} or latest
    -platform freebsd, linux, macos, win
    -arch x64, x86, armv6, armv7
--debug = There is very little output, compilation succeeds but may have omitted resources.

Now is the fun part, you get to find out which errors you had and how to fix them:
The first problem is:
package.json

A) You need to know the basics of JSON.
B) You need additional information in there to make sure it works.
C) Files are going to have to be declared manually, as the tool is not dynamic require aware. This means such things like:
const requireStructure = name => require(`../../structures/${name}`);
or:
function createNpmDependenciesArray (packageFilePath) {
    var p = require(packageFilePath);
...
Aren't going to work.

First step is find package.json in your root tree of your app package dir, and open it in a text editor. Duplicate your "main" line as a "bin" line:
  "main": "discord_bot.js",
  "bin": "discord_bot.js"
This is a sample config:

{
  "name": "DiscordBot",
  "version": "0.1.2",
  "description": "Bot for Discord app modded by genBTC",
  "readme": "README.md",
  "maintainers": [],
  "author": "",
  "repository": {
    "type": "git",
    "url": "git+https://github.com/genBTC/DiscordBot.git"
  },
  "license": "GPL-2.0",
  "dependencies": {
    "8ball": "^1.0.6",
    ...
    "youtube-node": "1.2.x"
  },
  "pkg": {
     "scripts" : ["src/client/websocket/packets/handlers/*.js",
...
        "src/client/websocket/packets/handlers/Ready.js",
...
        "src/client/actions/*.js",
        "src/client/actions/ActionsManager.js"
        ]
    }
}
JSON tip: Note the comma seperated [ list ] of files in "quotes", and with FORWARD / slashes as the path seperator. You can also use * wildcards.

Before we know what files we need to add, we need to compile the program (as shown before with --debug). You can also pipe the output using > result.txt to save it as a text file and look at it later.

C:\Software>DiscordBot.exe
Starting DiscordBot
Node version: v9.0.0
Discord.js version: 10.0.1
pkg/prelude/bootstrap.js:1172
      throw error;
      ^

Error: Cannot find module './handlers/Ready'
1) If you want to compile the package/file into executable, please pay attention to compilation warnings and specify a literal in 'require' call. 2) If you don't want to compile the package/file into executable and want to 'require' it from filesystem (likely plugin), specify an absolute path in 'require' call using process.cwd() or process.execPath.
    at Function.Module._resolveFilename (module.js:540:15)
    at Function.Module._resolveFilename (pkg/prelude/bootstrap.js:1269:46)
    at Function.Module._load (module.js:470:25)
    at Module.require (module.js:583:17)
    at Module.require (pkg/prelude/bootstrap.js:1153:31)
    at require (internal/module.js:11:18)
    at WebSocketPacketManager.register (C:\snapshot\discordbot\node_modules\discord.js\src\client\websocket\packets\WebSocketPacketManager.js:54:21)
    at new WebSocketPacketManager (C:\snapshot\discordbot\node_modules\discord.js\src\client\websocket\packets\WebSocketPacketManager.js:18:10)
    at new WebSocketManager (C:\snapshot\discordbot\node_modules\discord.js\src\client\websocket\WebSocketManager.js:24:26)
    at new Client (C:\snapshot\discordbot\node_modules\discord.js\src\client\Client.js:63:15)
This tells us that it couldnt find "handlers/Ready", and the faulty node_module is "discord.js".
Also, we can open the files indicated in blue and examine the .js scripts for what kind of stuff is being dynamically included, usually we can find a list of stuff such as:

So, we dig around in that dir, and find handlers/Ready (and all the other ones).
If you want to be precise you can:
Open up another command prompt to generate a listing of these files by :
dir /b *.js > list.txt
Then you can use NotePad++ to manipulate the text (add the rest of the path and " ", and form them into the list of files that needs to be passed to package.json.) Hopefully you are fast at this, because there is going to be a lot of files.
Otherwise you can suffice to say you found out that you want to add the entire
   "pkg": {
     "scripts" : ["src/client/websocket/packets/handlers/*.js",
        "src/client/actions/*.js"
        ]
    }

Process Explained:

You are going to repeat the process of Compiling, Looking at the compiler's debug output, Running the .exe and Looking at the binary's output. Then from that - analyze which files need to be included. You want to predict ahead of time and grab entire directories at once.

You can compare the results files, of the before and after - they should indicate success in adding.
C:\Software>DiscordBot.exe
Starting DiscordBot
Node version: v9.0.0
Discord.js version: 10.0.1
logging in with token
(node:49936) [DEP0013] DeprecationWarning: Calling an asynchronous function without callback is deprecated.
Using gateway wss://gateway.discord.gg/?encoding=json&v=6
Connecting to gateway wss://gateway.discord.gg/?encoding=json&v=6
Connection to gateway opened
Identifying as new session
Logged in! Serving in 2 servers
pkg/prelude/bootstrap.js:1172
      throw error;
      ^

Error: ENOENT: no such file or directory, scandir 'C:\Software\resources\default_app\plugins'
1) If you want to compile the package/file into executable, please pay attention to compilation warnings and specify a literal in 'require' call. 2) If you don't want to compile the package/file into executable and want to 'require' it from filesystem (likely plugin), specify an absolute path in 'require' call using process.cwd() or process.execPath.
    at Object.fs.readdirSync (fs.js:924:18)
    at Object.fs.readdirSync (pkg/prelude/bootstrap.js:776:35)
    at getDirectories (C:\snapshot\discordbot\plugins.js:5:15)
....
We've gotten further. This tells us we've logged in now, but it can't find the plugins directory. This is a directory right under our main app dir, and includes
some JSON and non-JSON files. resources\default_app is the internal name of the .exe's file-structure. So we need to include "plugins" into the exe. For this we can use Assets:

"assets" : ["plugins/*"]


If when you try to run the app, you get NPM trying to download and install stuff, its because it wasnt listed in your package.json dependencies. Just go in and manually add it.

After all this, it works!


Thanks for reading. GenBTC here, signing out. Happy Computing. This has been a 2017 genBTC Production.

Sunday, October 15, 2017

C++ Code Log - activities that I've been learning or doing the past month #1

Things learned:
Zenwinx/Udefrag needs only ntdll.lib no semicolon after. W/ NODEFAULTLIB on.
STUXNET = winapi getprocaddress loadmodule dll on NTDLL kernel WINAPI32 functions.
Depends.exe dependency walker
lib.exe /list:DLL/LIB | findstr strtofind
Assembly: WebAssembly + Emscripten
Use godbolt.org for Compiler Explorer to analyse assembly code.
CPP React
CopperStone w/e
libfat/reactos

Things from the past:
LIB+DLL = Linked Libraries, Shared (DLLs)
LIB+EXP = Static Libraries.
Static Vs Shared. MT vs MD  vs Debug ( MTd vs MDd)
WXWidgets 3.1 Compilation in 8 configs = 32/64 * Debug/Release * Shared/Static
make sure you create the directories right. Its advised to open up the vc($PlatformToolsetVersion)</wxCompilerPrefix> which was actually mentioned in the readme.
WinDDK/WinSDK/NTNDK
MSVC 2010 + SDK 7
2013 = C+11
2015 = C+14
2017 = C+17 
uCRT/uCRTD/MSVCRT/vcruntime.lib

VC Project Files. 
SLN basically does nothing 
VCXPROJ does it all. Edit it carefully, its like XML but less tolerant. 
Things have to go in the right order.
There is also an inheritance system. That is the parent and you can import other .props files in that, based on the order they will inherit in various rates.
The MSVC dropdowns are finicky and you need to realize theres inheritance there, and clearing is not the same as defaulting.
Also theres multiple configurations, and sometimes brings up the wrong config page.
You can set up additonal property pages with the "Property Manager" window. 

There is a utility called SLN2CMake and now VS2017 supports CMake. That way you can convert over.

Intricacies:
/d2noftol3 on CL.exe Compiler switch to disable remade SSE2 functions. Otherwise Linker issue without the ucrt.
https://stackoverflow.com/questions/19556103/how-to-get-vs2013-to-stop-generating-calls-to-dtol3-dtoui3-and-other-funct/31691179#31691179
Its a SSE primitive of Cvtds2dsi?
Windows uses 16-bit(2 byte) chars. Linux is 32-bit. use w_char or wchar_t

C++ Frameworks
Boost165 (Boost Optional. Boost Threading)
Intel Threading Building Blocks https://www.threadingbuildingblocks.org/
QT
CopperSpice
WX
Nana is a library for cross-platform GUI programming in modern C++ style (on Windows/Linux)
LANGUAGE C++11/14
COMPILER Any Standard C++ compiler(Visual C++ 2013, GCC/MinGW and Clang)


Github Projects Cloned or Starred


C++ Videos watched:

CppCon 2016: Dan Gohman “C++ on the Web: Let's have some serious fun." (WebAssembly)
https://www.youtube.com/watch?v=jXMtQ2fTl4c
Unicode Strings: Why the Implementation Matters
https://www.youtube.com/watch?v=ysh2B6ZgNXk
CopperSpice - C++ GUI Framework
https://www.youtube.com/watch?v=LIiwBNvTllk

Friday, July 21, 2017

Compiling FSV - the Jurassic Park program - on Windows 10 with MSYS2

Download the Source Code From https://github.com/genbtc/fsv/archive/master.zip
Github Repository @ https://github.com/genbtc/fsv
If this is what you are going after: http://fsv.sourceforge.net/screenshots/
You came to the right place.

Compiling FSV (File System Visualizer) for Windows takes a bit of effort. This is the tutorial. You need to set up the "MSYS2" development environment, which you can consider similar to Cygwin, if you dont know, it basically sets up a linux environment, and entire filesystem, with windows compatible .exe's compiled of everything, on your Windows machine under a subdirectory like C:\Software\MSYS32

INSTRUCTIONS:
STEP 1 - MSYS

On my machine, I dont like making too many root folders, so I make a C:\Software or C:\Code or whatever name, to put all my dev environment stuff in. Dont make the name too long and MAKE SURE IT DOESNT HAVE SPACES.

Download this version of MSYS2: msys2-i686-20161025.exe (its the latest 32 bit version)
It is available from sourceforge. https://sourceforge.net/projects/msys2/files/Base/i686/msys2-i686-20161025.exe/download

Install it, Pointing the installer to your C:\Software\MSYS32 directory.

We want the "launch after install" button when its done. (otherwise launch it from "C:\Software\msys32\mingw32.exe")
Note: the terminology MSYS, MSYS2, MSYS32 are all the same thing.
Note: However, now we want mingw32.exe (gray icon) don't confuse it with msys2.exe (purple icon)
You should now have this running:

Note: The following commands start with $ to indicate its a command at a command prompt. Dont retype it...

$ pacman -Syu

Hit enter to install the updates. After its done, it asks you to terminate it but you have to click the X until End Process shows and force end it. Also make sure pacman.exe is not running in task manager. Close it if it is.
Note: This requires internet access. If you are using Windows Firewall, you are going to want to disable it during the process because theres just too many .exe's that needs access to manually allow all of them. Dont get stuck on this step trying to do that...

Once again, open back up the MINGW32 shell ("C:\Software\msys32\mingw32.exe") and run the same command again:

$ pacman -Syu

Continue Installing Stuff, these are development packages:

$ pacman -S base-devel unzip mingw-w64-i686-toolchain mingw-w64-i686-gtk2 mingw-w64-i686-freeglut mingw-w64-i686-gtkglext

It will ask you some things, use the default, just press enter each time. Then it will take a while.
base-devel = provides autoconf/automake/pkg-config/tons of stuff.
toolchain = provides GCC,G++ stuff to compile.
GTK2 = a pre-requisite for the user interface (window dressings, menus etc).
Freeglut = an open source version of GLUT which is an API to OpenGL.
GTKGLext = the OpenGL extensions for GTK which we also need.

INSTRUCTIONS:
STEP 2 - Source Code

Download the Source Code From https://github.com/genbtc/fsv/archive/master.zip
(It has to be my repository, because that is where the changes for the Win32 port are)
Extract the FSV source code .zip file from github to your Home dir @ C:\Software\msys32\home\...\ so it lives in C:\Software\msys32\home\...\fsv-master\ (where ... is your username) and has the src/ subdirectory underneath.
Note: the screenshots show fsv-orig (but yours can be fsv-master or fsv)

STEP 2a - Compiling the source code of a gtkglarea-release (pre-req)
Execute the following:
Extract the source of gtkglarea-release-2-0-0.zip to gtkglarea-release-2-0-0 by typing:

$ cd fsv
$ unzip gtkglarea-release-2-0-0.zip

This package provides the required source and the library, and is not available through pacman, so I have provided it in original unmodified form.

Execute the following:

$ cd gtk[TAB](to tab complete)[ENTER]
$ ./autogen.sh

It will run, auto-generate, and auto-execute the configure script for you.
You should see this now:


$ make

You will see a whole ton of stuff scrolling past, this is the actual compiler GCC being run on all the source files. It shows some errors about libtool, but no problem.


$ make install

This will copy the files outputted from "make": libgtkgl-2.0-1.dll and libgtkgl-2.0.a (the linux version of a .dll) to a linux system-wide directory (I could have just provided this file but you wanted to compile stuff)


$ cd ../
$ ./autogen.sh

autogen.sh is the program that checks the autoconf file (configure.ac) and automake file (Makefile.am) input files and parses them into a ./configure script and ./Makefile script
You should see this now:


Execute the configure script.

$ ./configure


If this produces some kind of error, instead of ending happily, refer to Troubleshooting Error #1 below.


$ make


It will compile a ton of stuff, and then end unceremoniously.
But its done now! Now you can install the program by typing:

$ cp fsv.exe /mingw32/bin/

And run the program by typing:
$ fsv


Note: Errors? Read Troubleshooting Below.

Troubleshooting:
ERROR 1:

You did not compile or install the gtkglarea-release-2-0-0.zip properly. Re-read the instructions.
As a last resort, you can override that check by removing the word gtkgl-2.0 from "C:\Software\fsv\configure.ac" (find and delete only that word) and rerunning ./autogen.sh and rerunning ./configure. HOWEVER since you need this package to continue, I doubt that will help.

ERROR2:

                                      OR
ERROR3:

If it says the libgtkgl-2.0-1.dll is missing or you receive the message: " The procedure entry point g_malloc_n could not be located in the dynamic link library C:\..\libgtkgl-2.0-1.dll "
Make sure you place your fsv.exe INSIDE the MSYS binary dll directory (ex: C:\Software\msys32\mingw32\bin\ )
Then you can just make a shortcut to it, and run that.
Alternatively, you can add this C:\Software\msys32\mingw32\bin\ directory to your system environment PATH variable, in System settings as shown:

Alternate to this, you can also create a launcher .bat file. such as "LaunchFSV.bat",  file as a launcher. This sets the required Windows' System Environment "PATH" variable. When you are inside MSYS, it sets the PATH for you, so you can launch it from there no problem by typing ./fsv or ./fsv.exe , But when you try to launch it from Windows, you get libgtkgl-2.0-1.dll errors because it cannot find the all the .dlls we installed through MSYS (in addition to that specific one).
LaunchFSV.bat
PATH=%PATH%;C:/Software/msys32/mingw32/bin;./;
start fsv.exe


ERROR 4:
Disregard this error. It has no impact on the final outcome, and can safely be ignored.

ERROR 5:
You downloaded the source from the wrong repository. You need the genBTC repository (mine), because that is where the win32 fork changes are located. https://github.com/genbtc/fsv and https://github.com/genbtc/fsv/archive/master.zip
OTHER ERRORS NOT LISTED:
Report any bugs on the github repo. Everything will be handled through Github.

Using FSV:
It takes a CONSIDERABLE amount of time for the program to traverse the entire directory structure, (at anywhere from 300-6000 per second) and it does not display much until it does. For your first run, you should point it to a folder with a small amount of files and subdirectories.  FSV.exe takes path arguments, and the bat file does too, so you can put the .BAT file in your Windows SendTo folder, and then right click any directory and Send To LaunchFSV.bat, and it will launch starting in that dir.


Theres a bug in the "Change Root" command, 
You have to delete everything in the bottom text box, THEN click OK, for it to work. It will open to what it says in: "Selection". If you fail to do this, it will just rescan whatever dir you're in, and that sucks. I will work on fixing this soon.

SCREENSHOTS:

This is how it looks in Tree View:
This is how it looks in Map View:
This is how it looks in Disc View (very experimental):


Enjoy. I have not done anything significant enough to claim a copyright on this project, please refer to the original owner's repository and license documentation @ https://github.com/mcuelenaere/fsv

Thursday, July 13, 2017

FSV Filesystem Navigator - from Jurassic Park - SGI IRIX Sun Solaris clone - running on Windows

Ive been working on porting this 3D Filesystem Viewer or FSV from Linux to Windows. It looks like this and was made by this guy: https://github.com/jtsiomb/fsnav

(little sample of errors to clear)


For some reason i decided to try to download this one https://github.com/mcuelenaere/fsv because it has a lot more to it, like a whole menu/window/status/UI :) and it was wayyy harder to compile, in fact its not even fully working, theres a few issues preventing me from distributing it. But as you can probably tell, the look is just NOT there, its all wrong, you cant move well. Its a pretty bad program, even if it was for all intents and purposes the most real "clone" of the original SGI code. Which I do have and its from 1992-03-19 which is where the visual aesthetic of the blue Sky, grass, desert, ocean, space, indigo themes come from. Nobody elses code really has that. And it probably has more stuff, but i dont think i have the actual source available, just half of it.


Coded by
-genBTC

Tuesday, June 06, 2017

Github, Git, Git Extensions, using Git, Git Tips and Tricks, Git for Windows

Git Tutorial #1 - Reset current branch to delete local commits with no data loss, and replace with 1 better remote commit

When you are working on a project thats undergoing changes so rapidly that you have no chance to do milestones or take breaks to put out stable versions, you should still commit LOCALLY (Commit, not Commit&Push) often to back up your work, and have old code to go back to during troubleshooting. Taking the time is annoying so just write as little description as possible to save time. 
Then after you have gotten to a milestone or a stable point, you can throw all those away, and Commit and Push ONE single solid commit with complete description and thought put into it when you have time.
This is best to do with local commits only, otherwise there can be some weird situations.
I mean you can do it, but its bad practice to change the history.

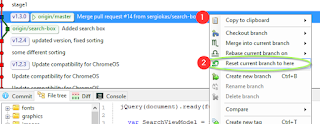
Step 1 - Highlight the last commit you want to keep.


Step 2 - Right click on it and choose Reset current branch to here.


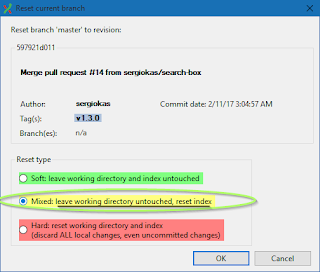
Step 3 - This is where you make important decisions. In this tutorial we want to leave our files unchanged, and just delete the commit indexes.


Step 4 - Now it will show the last commit as the past one you picked, and that "New" files can be committed. Still no file data has changed.  At this point you want to the final Commit, and (most likely Push to github too).


Step 5 - You see you've effectively turned all the junk into 1 well formatted commit.


Can the text/descriptions for the old ones can be copied to the new text? No. There is no easy way to aggregate them all like some other git merge commands do. This is why I said dont put that much effort into the temp names. You could copy/paste em manually if it was that important.

Saturday, June 03, 2017

Synergy and Serial Number Activation Key for SSL security - Reverse Engineering the source code (easy)

Intro:

Synergy is a great program, marketed and sold by a company called Symless. It's like a network KVM w/ drag&drop files and clipboard support so you can use multiple computers at once. Point being, it also supports SSL encryption - but not for free.
Theres a Basic license for $19 (which from what I can tell does exactly nothing extra from what you already get without paying)
And a Pro license for $29. Pro gives full SSL (TLS through OpenSSL) AES-256 bit security for your connections. AES256-GCM-SHA384 TLSv1.2

You can't even download the free version from their website anymore. But it is Open Source @ https://github.com/symless/synergy-core
EDIT: They have since moved to calling it "Synergy-Core" as Open Source to distinguish from the paid.

It doesnt matter whether you download binaries somewhere (current version is 1.88 stable as of this writing), or compile it yourself (pretty difficult) - because it ends up installing essentially an unregistered, not activated version without SSL.

But we can fix that.... (without even tampering with the program file)!

Reading the Code:

Since the source code is public, we can reverse engineer their pointless activation scheme. To reverse engineer it, start by heading to the source: https://github.com/symless/synergy-core/
You can look through the source code and you will find this;

https://github.com/symless/synergy-core/blob/master/src/lib/shared/SerialKey.cpp#L126 = The SerialKey::toString() definition neatly shows us the basic format of the key.

https://github.com/symless/synergy-core/blob/master/src/lib/shared/SerialKey.cpp#L226 =  The SerialKey::parse() function actually has an example key in the comments, and is showing the validation routine.

This is what we can gather: a string needs to begin and end with a {  } and has 8 semi-colon ; seperated fields (or 9 but we dont want that one - thats for starting a trial of pro). For the last two fields we put 0 for unlimited.

Such as :
{v1;pro;YOURNAME;#userLimit#;EMAIL;BUSINESSNAME;0;0}

However you cant just paste that in, it needs to be encoded into hex....

Cracking the Code:

I've made it easy, automatic, non-intrusive, anonymous, and not sketchy at all. Visit this online C++ compiler and hit the "RUN" button to run the code (in the cloud) that I've created, (based on the source code). The code runs in the cloud not your machine and is totally safe.  Feed it any values you want for name/email - they dont even have to be real!:
Activation Key Number Generator Script Serial  for Synergy http://cpp.sh/3mjw3

NOW you can paste that Hex code in. Voila, its activated.

Afterword:

You should still donate the company some money when you get the chance so they can continue to provide this great software AND keep it open source.

Note= both machines need to have the license key for SSL handshaking to work, and they both need to be on the same version (or close). The OpenSSL accept fingerprint window will pop up, thats how you know its working.

Proof of Concept Picture:
https://puu.sh/w9y0h/b67ecae2fb.png

Theres no way they can know, I checked. Unless they read this :) If they do, PM me.

Wednesday, May 31, 2017

Windows 10 Restricted Traffic Limited Functionality Baseline


Theoretically this is what microsoft recommends for businsses to control what data gets out.
And you can do it to protect yourself.
It basically locks windows firewall down to absolute minimum, and turns on a ton of group policy settings to restrict stuff (that may or may not help - given what Mark Burnett has recently posted about)
And also probably disables a lot of excess windows features that you likely dont need.

Thats what me and burnett do, we also both use a program called Windows Firewall Control.
as a frontend for regular Windows Firewall.

Download the first link zip file from microsoft and read how to use it and apply it,
(it will kick you offline if you dont have firewall rules whitelist allowed for every program you use)

https://www.google.com/search?q=Restricted+Traffic+Limited+Functionality+Baseline

You also have to download this: https://msdnshared.blob.core.windows.net/media/TNBlogsFS/prod.evol.blogs.technet.com/telligent.evolution.components.attachments/01/4062/00/00/03/65/94/11/LGPO.zip
seperately, and extract it to \1607\Tools and \1703\Tools dir. (The script relies on it and without having it you might think it worked if you're not careful, tho it does say one tiny error. )
This page explains LGPO if you're interested in group policy objects https://blogs.technet.microsoft.com/secguide/2016/01/21/lgpo-exe-local-group-policy-object-utility-v1-0/

Friday, May 12, 2017

Last Blog Post was too long. TLDR:

You can download the Windows 10 Security Updates seperately from the Creator's Update.
And its much less risky.

To get a history of when you last installed updates,
open a command prompt and run:
C:\Windows\System32\Wbem\wmic.exe qfe list
look for the last one from NT AUTHORITY \ SYSTEM and look at the date. Thats how out of date you are.

then run:
ver.exe

Look for the ver and download the right one below:
*Written May 12, 2017. Current until June 13, 2017*

For ver 10240: download this:
http://download.windowsupdate.com/c/msdownload/update/software/secu/2017/05/windows10.0-kb4019474-x64_4ed033d1c2af2daea1298d10da1fad15a482f726.msu
For ver 10586: download this:
http://download.windowsupdate.com/c/msdownload/update/software/secu/2017/05/windows10.0-kb4019473-x64_c23b6f55caf1b9d6c14161b66fe9c9dfb4ad475c.msu
For ver 14393: download this:
http://download.windowsupdate.com/c/msdownload/update/software/secu/2017/05/windows10.0-kb4019472-x64_dda304140351259fcf15ca7b1f5b51cb60445a0a.msu
For ver 15063: download this:
http://download.windowsupdate.com/c/msdownload/update/software/secu/2017/05/windows10.0-kb4016871-x64_27dfce9dbd92670711822de2f5f5ce0151551b7d.msu

Updates come once a month, on the 2nd tuesday of the month.
When you need to check for updates, bookmark this URL directly: 

Windows 10 Update History List

Monday, May 08, 2017

Windows 10 Build / Version Differences, Security Updates and Windows Update trick ( skip Automatic Updates and patch manually ) Microsoft Retires Support for 10240 RTM May 9th, 2017

THE STORY:
Microsoft is not to be trusted. The thought of them sending me a new automatic Windows Update overnight and possibly (read likely) breaking my computer, and me waking up to a mini-disaster drives me crazy. Therefore I turn off Automatic Updates, but that created a security concern because the OS stopped getting security patches when I stopped Windows from installing the November Update wayyyy back in 2015 when that was bricking everyone's installs. But I have finally solved the dilemma: the Security Updates themselves can be installed manually, easily, and WAY more safely than you ever believed possible!! - without BRICKING.
You can now have complete control over your OS back, without Microsoft meddling from afar.
If you follow this guide, you can always have the latest security updates. You can also wait up to 1 year for the OS build updates to get fully matured into the stable, non-disaster causing, procedure that it should have always been but never was. Then you can install the new build version when the old one gets retired. The first retirement of the initial build 10240-RTM happens tomorrow May 9th, 2017. In my case since I'm still on original 10240, this means I have until the next month's patch, June 13 2017, to install the 14393 anniversary update build without going out of date. What I am doing here is staying on the "LTSB" (Long term Servicing Branch) for as long as safely possible.

BACKSTORY:
Microsoft is calling Windows 10 "The Last Version of Windows" because it is providing OS updates as a service, over the internet, almost exactly like what Apple can do with their OSX (which has been to multiple "versions", such as 10.11 (El Capitan) - by now).

They did a bad job at explaining exactly how all this works, so I am forced to write this blog.
Fortunately the Microsoft.com website has actually become quite helpful in the past few years, if you know where to look, and is where I obtained all this information from. I am just compiling it here for simplicity.

Each version is a rolling release, built off the last one, leading you to believe Windows 10 is Windows 10 is Windows 10.
THAT IS WRONG!!!1
(not talking about Home/Pro - thats called an Edition -(even those are the same codebase))


Versions of Windows 10 so far:
(sourced from Wikipedia)
This site explains it further: https://technet.microsoft.com/en-US/windows/release-info
Find your Version :
Find out which version of Windows 10 you have by doing Start > Run:  winver  ,or going to the command prompt and type ver and look for the build numbers such as either of  10240, 10586, 14393, 15063, 16184.

1. OS App & Feature Updates:
The chart shows 5 versions. Microsoft only releases these about 1 time a year. You can consider each of these a "branch". Think of Microsoft as using Git/Github/TFS (version control). These refer to what I call "Feature Updates".  Every time the OS updates are called stuff like: November Update, Anniversary Update, Creator's Update - they add some new Apps and Features.
You can read about what goes into all the Feature Updates for each of the versions here:
What's new in Windows 10 (all versions)

2. OS Security Updates:
Microsoft releases these exactly once a month (on the 2nd Tuesday of the month - "Patch Tuesday").
Since each of the 5 versions got branched and now have SLIGHTLY different stuff, ideally all need to get patched with the latest security updates, patches, bug fixes, and slight improvements. This is a lot of hard work for Microsoft. Patching 5 branches with the same patch of code is impossible, changes must be made manually to shoehorn the patch into an older OS. This is why, highlighted in blue in the chart above, is May 9th, 2017 - the date they will be "retiring support" for the original build 10240. They will issue the last Security Update (tomorrow), and stop working on it. It has been called the "Long Term Servicing Branch" (a term borrowed from the Linux realm). 2 years. Long Term.
After May 9th 2017, the NEW recommended older LTSB branch will be 1607 Anniversary Update, which should be good for another year or so.


Service Branch Version list (shown)


Where to Download:
Pick the VERSION that corresponds to your build number:
When you need to check for updates, bookmark this URL directly: Windows 10 Update History List
How to Download:
When you've clicked on your proper version, you are given a list of updates. Click on the topmost recent one, and it will actually provide a Changelog since the last update, if you want to read through them all. 
At the bottom there is a bunch of links, You want this one in red:
This file size mentioned in blue is supposed to match the following link, but in this case it does not! - k Microsoft.

Click on the Download button - Make sure you choose x64 for 64-bit OS, or unmarked means 32-bit x86. Then execute the .exe file. (If you chose wrong one by accident no big deal just get the right one). 
Microsoft has very fast servers for this.

The update process will start immediately and look something like this:
You may recognize this window vaguely from all the way back to Windows XP :)
This is the slim-patcher, not a full "panther Setup". Theres way less chance of killing the operating system, or getting stuck at an Pre-boot Update screen where you can't do your work, however it does still need a reboot.
But for 1 gig of new OS files, this completed relatively fast, in about 5 minutes for me. Now the OS is fully security patched, updated, protected - and not ready to brick itself at the next Windows Update.
They really are cumulative too.
Enjoy!

Monday, May 01, 2017

FIXED - 'wmic' is not recognized as an internal or external command

I was getting this error, on a common Windows Management Interface C(?)ommand, wmic, as in wmic.exe.

Don't get worried the file still exists, you probably just messed your PATH variable up like me.
Execute this command:
set PATH=%PATH%;%SystemRoot%\System32\Wbem
Then you can execute wmic as per normal. To make this setting persist, you have to add this path:
%SystemRoot%\System32\Wbem (aka C:\Windows\System32\Wbem
into the Environment Variables section of Windows System / Advanced system settings / Advanced tab / Environment Variables... (button on the bottom). Add the path to the System variables section (bottom half). Just tack it on the end to whatevers there using ; to seperate. (or your user only if you want).

Anyway for all this typing, the WMIC command is very useful and you can have some fun with all its commands. Its useful for scripting as well. Here is a what I was after:

> qfe list
(wmic qfe list)

Friday, March 03, 2017

Nintendo Switch can't see WIFI, no connection

The Nintendo Switch has a 802.11/ac WIFI chip in it, that runs on 2.4ghz AND 5ghz.
So for people who are getting a problem, where you try to hop onto your wireless network and the switch just doesnt see it. But it can see other people's.

REASON:
This means that most likely your router is using the wrong security settings.
Log in, and locate: "Security" and search for Authentication Method or something using the words TKIP or AES.
The choices are:
1. TKIP
2. AES
3. TKIP+AES (combined together)

You want to select AES  and apply settings (possibly reboot) to your router. Then your switch will be able to detect your WIFI again.